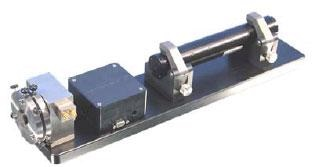
The AIMS Interferometer represents over 20 years leading edge development resulting in easy to use, robust products, which have been specifically optimised for each measurement application.

Instrument Accuracy
Typical accuracies obtainable from these outstanding instruments are:
- Length: + 1 nm over 25 mm or 1,000 mm
- Vibration: + 1 nm over 25 mm
- Angle: + 0.01 arc seconds over 40 arc minutes
- Gas refractivity: 2 x 10⁻⁸ over unlimited range
- Liquid refractivity: 1 x 10⁻⁶ over unlimited range
Instrument Configurations
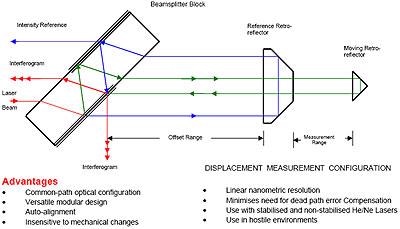
All instrument configurations are built around the AIMS™ Interferometer (Adaptive Interferometric Metrology System). This utilises a helium-neon laser source and a Jamin-type beam splitter block on to which are attached appropriate modules for each particular measurement scenario.
Advantages of the AIMS Interferometer
The design of the AIMS™ Interferometer has the following distinctive advantages:
- Maximum flexibility
- Nanometric capability
- Modular design
- Auto alignment
- Ultra-stable
- Ease of use
- Applicable to hostile environments
- Processor controlled
- Modulated reference retro-reflector
Maximum Flexibility
The innovative, patented optical configuration may be used as a permanently installed instrument or incorporated into customer-specified hardware.
Nanometric Capability
The optical design of the AIMS™ Interferometer beam splitter automatically eliminates unwanted reflections from the optical system. Only the unavoidable “self aligned” strays concomitant with the use of cube-corner retro-reflectors remain in the system and the “worst case” effects of these is significantly below the subnanometric path difference level. Ideally suited for non-contacting, non-destructive displacement measurement for MEMS devices.
Modular Design
Different cost effective modules may be utilised without any compromise of performance.
Auto Alignment
The reference and measurement beams are automatically aligned in a common direction with the retro-reflector systems being in the same “arm” of each interferometer. This results in both “common-path” and “zero dead-path” measurement characteristics for the instrument.
Ultra-Stable
Each interferometer is designed around an innovative common-path optical configuration, which ensures the system is insensitive to unwanted mechanical changes and air refractive index changes.
Ease of Use
The use of cube-corner retro-reflectors requires only two relatively basic alignments for the interferometer to function, these being the superimposition of the reference and measurement beams to form interferograms and for these interferograms to fall onto photodetectors. Optimum contrast is realised when the two beams are completely superimposed.
Applicable to Hostile Environments
By examining the reference and moving retro-reflectors through a suitable quality optical window, the interferometer can be operated in extremely hostile environments, the instrument realising high precision “common-path” measurement whilst totally isolated from the environment. The measurement range of the instrument is controlled by the coherence length of the radiation source chosen and the “offset range” by the divergence of the laser beam.
Processor Controlled
A custom designed electronic processing unit ensures each interferometer operates with optimum performance. The processing unit also allows data from the interferometer to be externally displayed or stored in a PC.
Modulated Reference Retro-Reflector
The modulator unit, together with its electronic driver unit is employed to electro-mechanically scan the optical path in the interferometer. This facilitates both the optical alignment of the system and the calibration of the mathematical technique employed in the software to optimise the electronic signals. The control provided by the unit ensures that the AIMS Interferometer system realises both nanometric measurement sensitivity and precision.’
Features
The unique retro-reflector unit incorporates optical alignment controls and the Interferometer head contains a micro-processing board for opto-electrical signal processing and automatic electronic optimisation. The instrument is insensitive to mechanical changes and minimises the need for dead-path error compensation.

Technical Details
|
|
|
Measuring Range (mm)
|
Up to 1000mm
|
25mm
|
|
Offset Range (m)
|
Up to 1m
|
Up to 1m
|
|
System Resolution (nm)
|
Down to 1nm
|
Down to 1nm
|
|
Nominal Laser Wavelength (nm)
|
632.8
|
632.8
|
|
Laser Frequency Stability
|
2x10⁻⁸
|
2x10⁻⁸
|
|
Operating Temperature Range (°C)
|
15-30
|
15-30
|
|
Atmospheric Refractive Index Variation Correction
|
|
|
|
- Standard
|
1x10⁻⁶
|
1x10⁻⁶
|
|
- Gas Cell Incorporated
|
5x10⁻⁸
|
5x10⁻⁸
|
|
Retro-reflector Automatic Electronic Optimisation
|
|
|
|
Retro-reflector Translation Rate (mm/s)
|
300
|
300
|
|
Reference Retro-reflector (mm)
|
38
|
38
|
|
Moving Retro-reflector (mm)
|
15
|
15
|
|
Inferometer Head (mm)
|
98x96x56
|
98x96x56
|
|
- Pre-Amplifier Board (Sin/Cos Analogue Outputs)
|
|
|
|
- Micro-Processor Board (Opto-electrical signal processing)
|
|
|
|
Interface : Serial
|
RS232
|
RS232
|
|
Supply-Line Voltage (V)
|
100-240
|
100-240
|
|
Supply-Line Frequency (Hz)
|
47-60
|
47-60
|
.jpg)
This information has been sourced, reviewed and adapted from materials provided by Queensgate Instruments.
For more information on this source, please visit Queensgate Instruments.