Duplex stainless steels are typically known to have a dualphase microstructure that contains both ferrite and austenite grains. This so-called microstructure offers a uniquely beneficial combination of mechanical properties. By itself, ferrite possesses poor formability, yet is known to have high strength, which is obtained from its body-centered cubic (BCC) crystalline structure (Figure 1). This BCC structure requires more energy to instigate slip as it does not have true close-packed planes. Austenite is characterized with excellent formability, but it has comparatively low strength. The good formability of austenite was derived from its face-centered cubic (FCC) structure that features 12 slip systems.
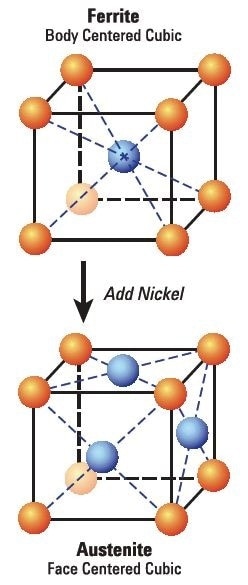
Figure 1. Ferritic stainless steel has a bodycentered cubic (BCC) crystal structure. By adding nickel, the structure changes from BCC to face-centered cubic (FCC) which is austenitic steel. Ferrite has a higher yield stress because the BCC structure has no true close-packed planes, and so slip systems require more energy to activate.
As a result, the existence of austenite and ferrite grains increases the total strength of duplex stainless steels, and at the same time maintains adequate formability for a wide range of applications. To form the duplex structure, less than the required amount of nickel is added to obtain a fully austenitic structure. As and when the steel solidifies, the BCC ferrite is initially formed, and as the last material solidifies the FCC austenite forms. During successive annealing, more austenite may form through a solid-phase transformation. The 2205 duplex alloy, by volume, contains about 50-50 combination of ferrite and austenite grains.
Nanoindentation is a suitable method to study the mechanical properties of separate austenite and ferrite grains in a duplex stainless steel. Nanoindentation was used by El Mehtedi et al. to probe 2205 duplex stainless steel. By applying a force of 2 mN, it was observed that there was no major variation between the two phases with regard to hardness (H) or modulus (E). In order to realize unparalleled testing speeds, the KLA Express Test option for G200 NanoIndenters uses conventional indentation testing process in a revolutionary way.
The Express Test carries out a complete indentation cycle for each second, including load, unload, contact detection, approach, and movement to the subsequent indentation site. One major advantage of the Express Test is its capability to map surface hardness as well as the elastic modulus quantitatively and in a reasonable amount of time. In addition, histograms of the outcomes effectively show the role of all of the constituents. This article shows how the Express Test is used to define the ferrite and austenite phases of 2205 duplex stainless steel.
Experimental Method
For the experiment, a 1” bar of 2205 duplex stainless steel was bought from McMaster-Carr. Table 1 shows the chemical composition furnished by McMaster-Carr. Element Materials Technology (Wixom, MI) prepared the sample for nanoindentation. Initially, a portion was cut from the bar, milled to 0.25”, and finally rough ground with water by means of silicon carbide beginning from 220 grit to 600 grit (US).
Table 1. Alloying elements of 2205 duplex stainless steel
| Element |
% by weight |
| Chromium |
21–23 |
| Nickel |
4.5–6.5 |
| Carbon |
<0.03 |
| Manganese |
<2 |
| Copper |
none |
| Molybdenum |
2.5–3.5 |
| Silicon |
<1 |
| Sulfur |
< 0.02 |
| Phosphorus |
< 0.03 |
| Nitrogen |
0.08–0.2 |
Using a 6 µm and 1 µm diamond, the samples were polished with a medium nap cloth using an alcohol-based extender. A low-nap cloth and a 0.05 µm colloidal silica were used for final polishing, and this was followed by vibratory polishing with a medium nap cloth and a 0.06 µm colloidal silica. Subsequent to polishing, CrystalbondTM was used to mount the sample for testing on a NanoVision stub.
The entire test was carried out with a KLA G200 NanoIndenter fitted with NanoVision Express Test, and a DCMII equipped with a Berkovich indenter. The test approach called “Express Test to a Force” was employed to execute a range of 40 x 40 indents within an area of 50 µm x 50 µm. Hence, 1.3 µm (1300 nm) was the partition between consecutive indents. 1 mN was the peak force for each indent and this force matched with a peak displacement of approximately 90 nm. An optical image of the whole range of residual impressions is shown in Figure 2.
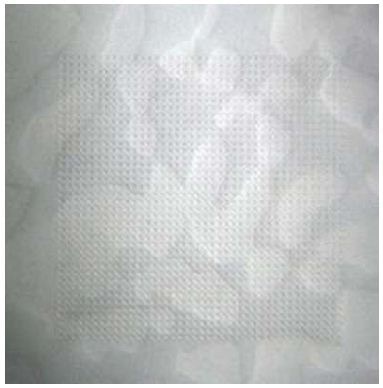
Figure 2. Surface of 2205 duplex stainless steel showing residual impressions from a 40 x 40 array of indents within a 50 µm x 50 µm area. Darker grains are austenite; lighter grains are ferrite. Peak force was 1 mN; testing time was 27 minutes.
Results and Discussion
The hardness map produced by the 1600 indentations is shown in Figure 3. Every indentation produces the information content for a single pixel in Figure 3, rendering this a 1600-pixel image. Based on hardness, both types of grains are clearly differentiated.
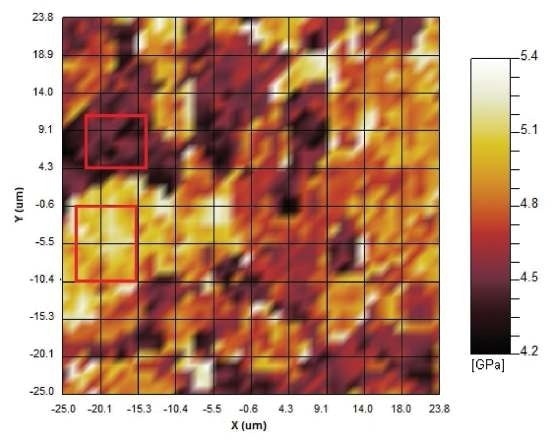
Figure 3. Hardness map of 2205 duplex stainless steel. Lighter colors represent higher hardness values. Ferrite grains are harder than austenite grains. Top red box indicates domain for austenite properties reported in Table 2. Bottom red box indicates domain for ferrite properties reported in Table 2.
To measure the properties of individual constituents, a couple of rectangular domains were chosen, which were present either in one phase or the other, and were shown as red rectangles in Figure 3. The top rectangle and the bottom rectangle are seen in an austenitic grain and a ferritic grain, respectively. They cover the 36 indentations and the 48 indentations that are utilized to measure the properties specified for austenite and the properties specified for ferrite, respectively. The 1600 hardness and modulus measurements are shown as histograms in Figures 4 and 5.
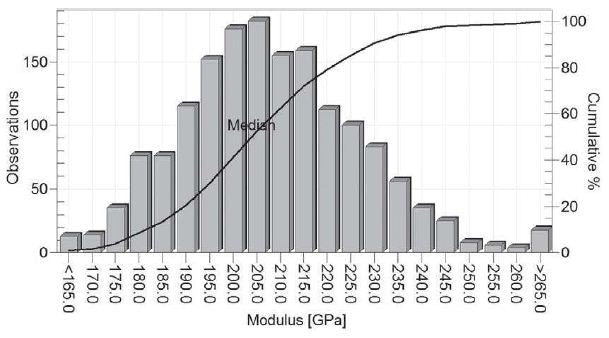
Figure 4. Histogram of 1600 modulus measurements showing normal distribution
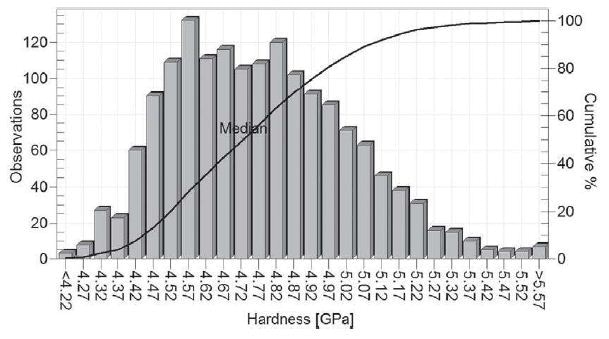
Figure 5. Histogram of 1600 hardness measurements showing bimodal distribution.
The modulus results and the hardness results manifest a normal distribution and a bimodal distribution, respectively. Table 2 summarizes the key results of this work. When compared to the austenite phase, the present work reveals that the ferrite phase is roughly 12% harder, but no major change is seen in elastic modulus between the two phases. For comparison sake, Table 2 shows the results of El Mehtedi et al. at 2 mN.
Table 2. Properties of 2205 duplex stainless steel
| Material |
Present work
1mN applied force |
El Mehtedi et al. (2010)[3]
2mN applied force |
| N |
E (std. dev.) GPa |
H (std. dev.) GPa |
N |
E (std. dev.) GPa |
H (std. dev.) GPa |
| Austenite |
36 |
206.6 (19.1) |
4.50 (0.08) |
10–15 |
198.2 (15) |
4.63 (0.2) |
| Ferrite |
48 |
208.2 (21.7) |
5.04 (0.12) |
10–15 |
211.5 (20) |
4.63 (0.2) |
| Composite |
1599 |
207.8 (18.9) |
4.78 (0.25) |
|
|
|
On the whole, the current results compare suitably well with those of El Mehtedi et al, but El Mehtedi et al. did not notice any major variation in hardness between ferritic and austenitic grains at 2 mN. In the current work, the discrimination of a slight variation is simply due to the huge number of measurements.
Observing 1600 hardness measurements as a histogram or a map explains a distinction that would be ambiguous with just 10 to 15 measurements for each grain. There is a possibility that mechanical properties rely on grain orientation with regard to the polished surface. The use of transmission-electron microscopy (TEM) to evaluate the crystallographic orientation of each grain could provide a better understanding of nanoindentation results.
Conclusion
KLA's Express Test Option for G200 NanoIndenters provides an unparalleled testing speed, which allows quantitative mapping of the surface’s mechanical properties. In this analysis, the Express Test was utilized to map the mechanical properties of a 2205 duplex stainless steel sample. When compared to the austenite phase, the ferrite phase was 12% harder, albeit both phases had the same elastic modulus. Results for both hardness and modulus compared suitably well with the earlier published results.

This information has been sourced, reviewed and adapted from materials provided by KLA Corporation.
For more information on this source, please visit KLA Corporation.