Apr 25 2009
Under the term nanotechnology, specialists develop and realize coatings or objects with thicknesses or dimensions of only a few nanometers. Due to their special, physical properties, the coatings or objects that are only a few atomic layers thin have particular advantages. For example, glasses can be coated hydrophobic, that is, water-repellent. Electrically conducting coatings that are only a few nanometers thin are used for mirrors and vehicle windows to control the blinding effect or the light transparency using electrical currents.

The lotus blossom effect is known through numerous publications. With it, a coating only a few nanometers thin provides a self-cleaning effect of the coated surface (e.g. solgel coatings). Furthermore, many nano-coatings are already used to protect synthetics and metals from wear and surface scratches, e.g., on CD-ROMs and hard disks. Also in development are extremely hard coatings made of chemically and physically non-mixable nano-crystals of, for example, titanium nitride and silicon nitride. They minimize the friction on processing tools and increase the wear resistance.
Thus, the advantages of nano-coatings are increasingly utilized in technical, industrial applications. For example, CD-ROMS, sunglasses or protective eyewear, car windows and mirrors, fittings as well as painted synthetic components are being coated. However, quality testing for coatings that are only a few nanometers thin is extremely elaborate. The reasons are the often entirely different physical characteristics in comparison to macro-coatings.
One important criterion when evaluating nano-coatings is the indentation modulus. The measurement method is already defined in EN ISO 14577. Similar to the typical hardness measurement, an instrument produces a pyramid-shaped impression in the surface using a specified load. The instrument measures the indentation depth, which is a measure for the hardness of the nano-coating. By evaluating the unload curve, one can draw conclusions about the indentation modulus, which for many materials corresponds to the modulus of elasticity.
From this and other material parameters resulting from the measurement procedure, one can draw conclusions about the quality of the nano-coating. However, the effective measurement of test loads of only a few millinewtons or of indentation depths of only a few nanometers has been difficult thus far. It required a very elaborate technology. Thus, until now the cost for nano-hardness measuring instruments has been uneconomically high. Such instruments are almost exclusively suitable for laboratory applications.
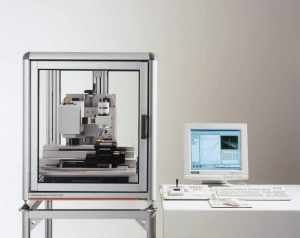
Now, quality testers in the field of nanotechnology can work much more cost-efficient using the PICODENTOR® HM500 of Helmut Fischer GmbH + Co. KG, Sindelfingen, Germany.
The cost of acquiring this instrument is less than half the typical cost of current comparable instruments. This is possible through the well thought-out design of the micro-hardness measuring instrument in combination with sophisticated evaluation electronics and software.
The resolution when applying the test load is only about 100 nanonewtons, and when measuring the indentation depth, about 40 picometers. The maximum test load of the instrument is 500 mN at a maximum indentation depth of 150 µm. With its automated measurement processes that last only a few seconds, depending on the specifications, it is not only suitable for laboratory measurements but can be used advantageously for quality assurance in manufacturing. In combination with a personal computer, the micro-hardness instrument provides all typical statistical evaluations, print forms and documentations. In this manner, it provides a qualified quality test in the field of industrial nanotechnology.
Through the development of a cost-effective micro-hardness measuring instrument suitable for use in industrial manufacturing, Helmut Fischer GmbH + Co. KG of Sindelfingen, Germany proves again its great competency and innovative power.