Jun 1 2010
Metal mirrors made with extremely high precision and exactly positioned are the key elements of modern telescopes. A new production technique enables complex optical surfaces to be manufactured with excellent trueness of shape and hitherto unattained positional accuracy. The mirrors have been built for an infrared sounder telescope.
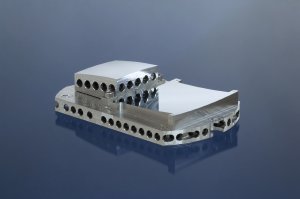
 The M2/M3 assembly with two exactly aligned aspherical mirrors from the IRS-Tel reflecting telescope was produced with extremely high precision by using additional reference marks. (© Fraunhofer IOF)
For space research as well as climate observation and weather forecasting satellites need increasingly powerful optical measurement and recording devices. They often consist of several aspherically shaped mirror elements which through their precise interplay provide the desired reflection of the incident light. "All the mirrors must be produced and characterized with extreme precision, that is to an accuracy of less than one micrometer. They also have to be exactly positioned in relation to each other," explains Sebastian Scheiding from the Fraunhofer Institute for Applied Optics and Precision Engineering IOF in Jena. Up to now this positioning has been very time consuming as it takes place step by step. First the individual mirrors are fitted in the telescope one after the other, then the imaging quality is measured. If inaccuracies or errors are found, they are corrected by positional adjustments to the mirrors. Then further measurements and adjustments are made until all components are optimally arranged.
"We wanted to simplify this complicated and time-consuming adjustment process," says Scheiding. In the research project initiated by the German Aerospace Center (DLR) the scientist has therefore developed an innovative production technique which takes into account the later alignment of the components right from the outset. For this purpose, the individual mirror surfaces are positioned in relation to each other as precisely during processing as they will be later in the telescope. This reduces to a minimum the errors and corrections made when the mirrors are being fitted. The assembly process is simple and reproducible.
"The trick is that we mount all the mirrors for a module in the same machine at the same time and assign them to a common system of coordinates. To this end, each mirror blank is provided with defined, ultra-precise measurement marks and reference surfaces," explains Scheiding. These fixed marks embody the system of coordinates for diamond turning of the mirror shapes. At the same time, however, they fix the position of each mirror in relation to the adjacent mirrors. Finally they also serve as reference points for subsequent measurement processes to check the quality of the optical system.
The IOF demonstrates the degree of precision that can be achieved by such reference structures on the example of a mirror arrangement for an infrared sounder telescope (IRS-TEL). It incorporates two mirror modules, each of which has two juxtaposed aluminum mirror surfaces. The shape of the metal mirror deviates only 126 nanometers from the ideal aspherical shape and the position of two mirrors in relation to each other is ten times more precise than for comparable conventionally produced mirror assemblies. "As a result we can make optical systems of this type to a far greater degree of accuracy, but at the same time we're cheaper because the time-consuming adjustment process during final assembly is no longer required," says Scheiding. The IOF's mirror module is on display at the OPTATEC international optical trade show from June 15 to 18 in Frankfurt (Hall 3, Stand D50).